

How to Perform a Professional Valve Job
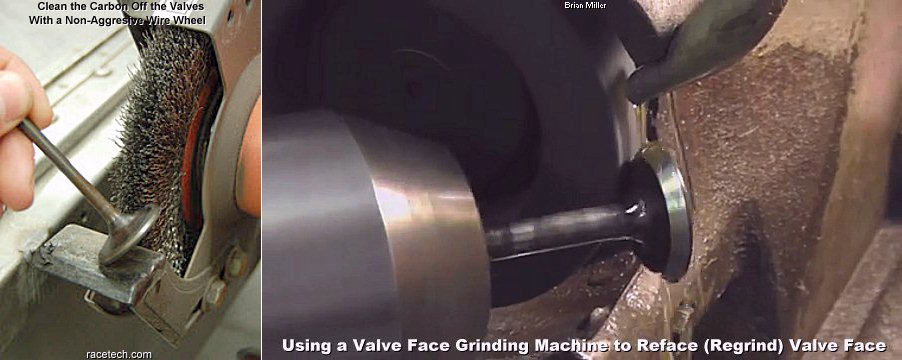
 Dotted lines or skip marks on valve faces after lapping-in means the stone in the valve grinding machine needs to be trued-up. The stone must be periodically trued-up, because due to a lot of use, it will wear unevenly, resulting in erratic or unsmooth valve face grinding.
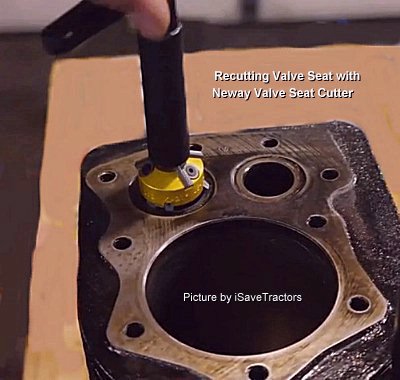
TENDTOOL- Valve seat inserts in Kohler flathead engines, with the exception of the K361 OHV engine, are made of extremely hardened steel and rarely wear, get damaged, crack or loosen. In fact, I have never replaced a valve seat in any of the 100’s of Kohler flathead engines that I’ve professionally rebuilt over the years. All I do to valve seats is recut or regrind the 46º [intake or exhaust factory angle] or 31º angle [intake only; to increase airflow] to put them back in perfect alignment with the centerline of the valve guide to ensure proper 360º valve sealing. And regardless to what some amateur or inexperienced engine rebuilders believe, valve seats are always recut or reground while in the block (or OHV engine). They are never removed to be recut or reground.
Before regrinding the valve faces and seats, the valve guides should be measured for excessive wear and replaced or repaired with a thin-wall bronze sleeve/liner if necessary, then the valve seats can be recut or reground with valve cutting or grinding equipment to be perpendicular with the centerline of the valve guides. This is important because the cast iron or aluminum engine block (flathead) or OHV (Over Head Valve) cylinder head can “move” or “bend and twist” just a few thousandths of an inch when it got hot for the very first time under normal operating conditions. This is called metal taking shape. Anyway, this “bending and twisting” of the metal can unseat the valve(s), and cause the engine to loose power, not idle well, and make carburetor adjustments difficult, especially at idle. I’ve seen this happen many times when individuals would rebuild their own engines. Valve lapping only places a rough surface on the valve face(s) and seat(s) so they’ll wear-in with each other to produce a perfect seal, but the seats and faces may not be perfectly in-line with the valve stem, which can cause leaking of compression, resulting in lose of engine power. If one don’t have their own valve grinder, most automotive machine shops will regrind valve faces for a few bucks. They can also regrind or recut the seats in a flathead engine block or an OHV cylinder head.
The valve faces need to be lapped in enough to create a gray colored line that’s the same width of the valve seat (1/16″-3/32″ wide) midway in the valve face. Then thoroughly clean off the valve lapping compound from the valve and seat, and look to see if the valve lapping compound made contact 360º around the valve face and seat. Most valves will lap midway on the valve face. The outer and inner areas of the valve face should remain shiny from the regrinding process or from being new, and the whole area of the seat should look gray. If this is the case, then the valve should seal 100% when it wears into the seat.
Valve Head Margin –
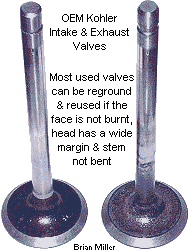
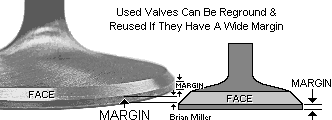 Most used valves can be reground and reused in an engine and give good service for a long time if the face is not severely burnt, head has a wide margin, and the stem is not bent. The minimum margin width for Kohler valves is .030″. If the margin is too thin, the head of the valve, especially the exhaust valve due to extreme heat, could become concaved or collapse in the seat. When this happens, the clearance between the lifter and valve stem is lessened and the valve will not fully close, and the angles of the seat valve face will not match, causing the valve to possibly leak and/or burn. FYI – Regardless of what you’ve heard, running an engine without a muffler or some kind of exhaust system will NOT cause the exhaust valve to burn. This is an old mechanic’s myth that got started many years ago when poor quality metal was used in the manufacturing of exhaust valves. Technology in metallurgy and quality of exhaust valves have advanced a lot in recent years.
Regrinding the valve faces at a 30º or 45º angle places the valve head in perfect alignment (perpendicular) with the stem or “straightens them out” again so they’ll be good as new. And regrinding or re-cutting the seats at a 31º or 46º angle ensures that the valve stems will be centered in the valve guides and the faces will seal 360º around. The reason for the 30º/31º or 45º/46º angles are so the valves and seats can wear into each other, producing a perfect 45-½º angle for each. Anyway, after the valves and seats are reground, the valve clearances can be set at specs with the piston positioned exactly at top dead center on the compression stroke. Then lap them in so the faces will produce a wear pattern on the seats (the lapping process helps produce the perfect 45-½º angle for each). After the valves are matched perfectly with the seats after about 2 hours of normal engine operation, the engine should start quicker, produce more power and the valves should last the life of the engine.
If you want a factory stock lawn & garden or stock competition pulling engine with an intake valve that has a factory-ground 45º/46º intake valve and seat, for it to produce a few more ponies, regrind the intake valve face and seat at 30º and 31º, respectively. Doing this will allow slightly more air (and fuel) to enter the combustion chamber to create higher compression pressures. It will do absolutely no harm to the engine either. Briggs & Stratton have been doing this (plus other performance enhancements) to their flathead aluminum block engines since 1969, and it works great! Briggs even gave the cylinder head on their 3.5hp flathead lawn mower engines a specially designed combustion chamber that increases the air charge when the incoming air (and fuel) enters the combustion chamber, and scavenges the burnt gases more thoroughly when exiting the combustion chamber!
On twin cylinder engines, it’s important that after the valve clearances are set on the cylinder with the piston positioned at TDC on the compression stroke, the crankshaft will need to be rotated 180º so the valves on the opposing cylinder can be set with the piston positioned at TDC on the compression stroke. Failure to rotate the crankshaft 180º will give the cylinder with the piston positioned at TDC on the exhaust stroke excessive clearance and the valves will make a very loud tapping sound when the engine is running.
To perform a professional valve job on a opposed twin cylinder flathead B&S or Kohler engine, the parts that will be needed are: two head gaskets, two crankcase breather gaskets, intake manifold mounting gaskets and valve stem seals (for intake valves only). New valve guides, especially for the exhaust valves, may also be needed. But that’s to be determined once the valves are removed. A quality-made valve spring compressor tool is required to remove and reinstall the valves. The valve faces and valve seats angles are to be reground or recut at 45° (intake valve face for Kohler), 30° (intake valve face for B&S) and 46° (intake and exhaust seats for Kohler and exhaust seat only for B&S), 31° (intake seat for B&S), respectively. If you can’t do this yourself, a local automotive machine shop can do it for you. You’ll need to take the engine or tractor to the shop to have the valve seats reground or recut. Make sure they’re reground or recut at the proper angle, too! And it’ll be a good idea to have both cylinder heads resurfaced on a wide flat sanding belt or large diameter disc sander to remove warpage and restore flatness, and to ensure proper head gasket sealing. (Sanders are not just for woodworking.) The head bolts can be reused. They rarely go bad.
Valve clearances in the Kohler Engine Specifications and Tolerances charts are given with a lesser and greater clearance. Example: .008″-.010″ intake, and .017″-.019″ exhaust. The lesser clearance is for worn-in valve faces and seats, and the greater clearance is for freshly-ground valve faces and seats, or new valves with fresh-reground seats. Because as a freshly-ground valve face or new valve wear into the seat, the clearance between the valve stem and lifter is lessened.
Seat Width –
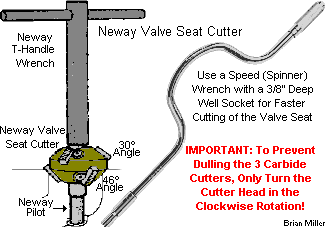 When regrinding or recutting valve sears, first cut or regrind the seat with a 46º [Neway] cutter or [Sioux] grinding stone until it makes contact 360º around the seat, then use a 31º cutter or grinding stone to narrow the seat width to factory specs if it’s too wide.
Ever noticed that when looking up valve clearances for an engine, the manufacturer will always show two figures? Example: Intake valve clearance: .008″ – .010″; Exhaust valve clearance: .014″ – .016″. The greater clearance is for a fresh valve job. Because as an engine runs, due to the 30º or 45º angle on the valve face(s) and the 31º or 46º angle on the seat(s), the valves and the seats wears together (break-in period), forming a 30-½º or 45-½º angle on each, which causes the clearances to become slightly lessened. (As the valves wears into the seats, forming a perfect seal, you may notice the engine produces slightly more power.) And for an engine (valves) that’s been in use for some time, the valves should be set at the lesser clearance because the valve faces and seats are already worn into each other (broke-in).
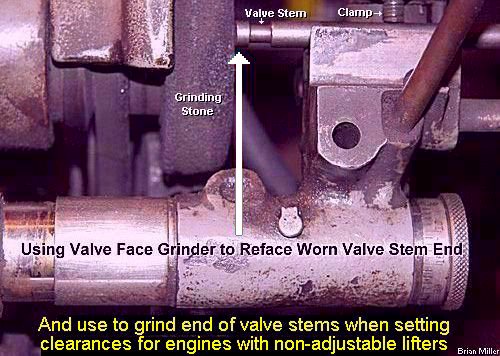 It’s also important that the end of the valve stem is perfectly flat. This will allow for correct valve adjustment and valve action, especially in an OHV (Over Head Valve) engine with rocker arms.
By the way – I get a lot of engines in my shop that need a valve job performed. Many other small engine repair shops will ignore the valves (or they’re not trained to perform professional valve jobs) and assume the hard-starting problem is elsewhere with the engine.
If they’re not burnt, then chances are, the valves and seats become warped from the block being heated under normal use after it was new and the metal “takes shape.” Aluminum blocks (and heads) are worse than cast iron blocks (and heads). This happens with small engines as well as automotive engines. The block will actually deform a few thousands of an inch, moving the valves off the seats slightly, causing them to leak. Sometimes the cylinder wall(s) will deform a few thousands of an inch, too. Once the “seasoned” block or head takes shape, they won’t warp any more. If the valves are leaking, then the valves and seats will need to be recut or reground so they’re be in perfect alignment with each other and perpendicular with the valve guide.